Introduction
You’re wondering how to schedule Instagram posts so you can save time and post more consistently.
FACT: Scheduling #Instagram content can actually make you more spontaneous. https://t.co/HYClnqqjAa via @socialmedia2day @PCutty pic.twitter.com/bvkwXkmomt
— Sprout Social (@SproutSocial) April 6, 2019
In this article we’ll explain why and how to schedule Instagram posts in 2022. We’ll also take you through our recommended process of scheduling Instagram posts on SocialBee.
Why you should schedule Instagram posts
Before we learn how to schedule Instagram posts, it’s important to discuss why small business owners and freelancers are scheduling their content.
Here are 5 of the key benefits to scheduling Instagram posts:
Save time
Post more consistently
Write SEO friendly content
Stay organized
Post from your computer
Let us know in the comments below the reasons why you want to learn how to schedule Instagram posts!
1. Save Time
Batching my content creation has changed my life. Friends call me the batching queen. I batch EVERYTHING – my social media content, my podcast, video content, admin tasks in my business.
Listen below to find out how I do it!https://t.co/uvOKqT1aud pic.twitter.com/MLIXA5olVz
— Denise Duffield-Thomas (@DeniseDT) March 10, 2022
As a business owner, you understand that time is money.
Most small business owners are responsible for most of the functions, especially social media marketing.
If you’re doing social media marketing the correct way, it can be very time consuming.
Batching your social media content creation and scheduling Instagram posts are both huge time savers.
2. Post More Consistently
It’s no secret that posting consistently on Instagram is a key to success.
According to a study by Later, if your account has under 1k followers, the optimal amount of posts per week is 14. They found that 14 posts per week delivers the highest reach and engagement rates per post.
Although, this changes your business account has between 1k and 250k followers. If your business account falls in this range, it’s recommended to post between 14 and 20 posts per week for the highest reach per post.
By scheduling your posts, there is no concern about getting too busy during the week to post. Scheduling Instagram posts allows you to determine the exact date and time that a post is published so that you won’t forget.
It’s also recommended to avoid disappearing from Instagram for long periods of time. If you’re traveling or taking time away from work, scheduling Instagram posts means your content will be published automatically and without you thinking about it.
3. Write SEO Friendly Captions
It’s not easy to write captions with the right keywords and hashtags on the fly.
Writing an SEO friendly caption involves time and research.
It’s also common to face writers block when trying to craft the perfect caption.
When you schedule Instagram posts, you can set aside time to write multiple captions at once. It’s much easier to write when you’re already in a writing groove.
Yes, SEO is important when publishing content on Instagram too. You want your content to show up when users are searching for relevant keywords or hashtags.
In order for your posts to show up early in relevant searches, you’ll need to optimize your captions.
Optimizing your captions involves using the proper keywords and hashtags that are relevant to both your post and what your target market is searching for.
Perform hashtag and keyword research to find the right keywords to use in your post. Tools like SEMRush, Mangools, and Long Tail Pro allow you to find keywords with high search volumes and low competition.
4. Stay Organized
Is your Content Calendar is ready?🤔
Not yet?🙄
Is a content calendar essential?🤔
You don’t think so?🙄
Let me tell you
To succeed as an entrepreneur, you need to plan. Whatever is a small or big business you have.😉 pic.twitter.com/FB95w8jtwu
— RM Creatives (@rmaecreatives) November 10, 2021
Content calendars are a great way to keep your Instagram content organized. They allow you to get a holistic view of you upcoming content and identify any gaps or inconsistencies.
When you’re in the habit of batching your content creation and scheduling Instagram posts, you’ll be able to keep your content on brand.
5. Post From Your Computer
Writing multiple long captions and performing keyword research is much easier on your computer. The full keyboard makes it easier to type long captions.
It also helps to see your content on a larger screen and be able to quickly switch between multiple tabs.
If you’re already creating graphics or editing videos on your computer, then it’s much more efficient to create your posts on your desktop.
So now you understand the benefits to scheduling your Instagram posts, so let’s dive in and learn how to!
How to Schedule Instagram Posts with SocialBee
SocialBee is one of the best tools for small business owners or social media managers.
Today we’ll be reviewing how to schedule Instagram posts with SocialBee, but they offer much more.
Create a SocialBee account
Connect your Instagram account
Create your post
Schedule Instagram post
1. Create a SocialBee account
Firstly, you’ll want to create your SocialBee account. Signing up for SocialBee is quick, easy, and there is no requirement to add a credit card.
When you first visit the SocialBee website you’ll see an option to start for free (see screenshot below).
To sign up for your account, simply enter a valid email address and create a password.
Once you have a SocialBee account, it’s time to connect your Instagram account.
2. Connect your Instagram account
Now that you’re set up with your SocialBee account, it’s time to connect your Instagram.
While you’re able to connect your LinkedIn, Facebook, Pinterest, and other social platforms, we’ll be focused on Instagram in this post.
After you’re singed into the platform, SocialBee brings you through a quick, guided onboarding process.
The first step of the onboarding process is to connect your social media accounts. Instagram is our main focus today, so we’ll start there. You can connect either a business profile or a personal profile.
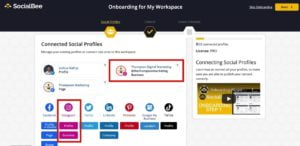
It’s highly recommend to have a business Instagram profile for many reasons. If you don’t have a business Instagram profile at the time you’re reading this article, then you can connect your personal Instagram account in the meantime.
Once your business or personal Instagram account is connected, you’re ready to create your Instagram post!
3. Create your post
You’ve now signed up for SocialBee and connected your business or personal Instagram account. Now you’re ready to create a post!
Your SocialBee dashboard will display all of your connected social media profiles and allow you to add additional profiles.
On the top of the dashboard, you’ll see a large button that says “Add new post”. Simply click that button to get started creating a post!
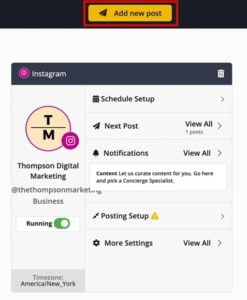
You’ll notice when you’re creating a post that SocialBee allows you to choose which of your social media pages you want to post to. You can create the same post optimized for multiple social media pages at the same time.
Upload media
After you specify that you want to post to Instagram, it’s time to import your media. SocialBee supports dropping multiple images and/or videos into a post at the same time. In Instagram, a carousel post will be created.

You’re able to create content in Canva directly within the SocialBee platform. Simply click the “Design with Canva” button and you’ll see a Canva window pop-up within your existing SocialBee window. This further improves efficiency within the social media marketing process.
Write an SEO friendly caption
Hopefully you’ve done your keyword and hashtag research and now you’re ready to write a caption for your post.
Once you’re ready to write your caption, simply start typing in the box provided. You’re able to add emojis, hashtags, and format your text within the caption box.
If you want to A/B test a few different captions, SocialBee has the option to add variations to your caption. Simply click the “Add Variations” button to test how different captions perform with your audience.
Now that you’ve used relevant keywords and hashtags to your SEO friendly caption, you’re ready to schedule when your Instagram post is to be published!
4. Schedule Instagram post
Finally, you’re ready to schedule your Instagram post!
Choosing the right time to publish your Instagram post is important. You should perform research to determine the best days of the weeks and times to post. The time and day of which you post will determine your reach and engagement.
The best way to determine the best time to post to look back and look at your top performing posts and see when they were posted.
Also check out this ultimate guide to determining the best times to post on Instagram.
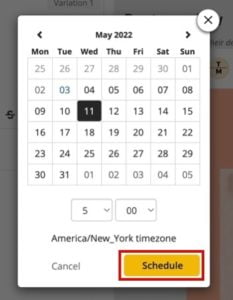
Scheduling the post is very simple in SocialBee. Simply click “choose a posting time” and you’ll see a clickable calendar appear.
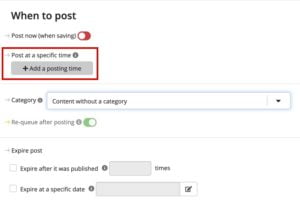
All you have to do is click on the day you want your Instagram post to be published and specify the time.
Once you’ve specified the date the time you want your post to be published, simply hit “schedule”.
Just like that, you’ve scheduled your first Instagram Post!
Conclusion
Congratulations, you’ve just learned how to schedule Instagram posts with the awesome tool, SocialBee!
To recap, we discussed 6 benefits to scheduling Instagram posts in 2022:
Save time
Post more consistently
Write SEO friendly content
Stay organized
Post from your computer
Next, we walked through how to schedule Instagram posts on SocialBee in 4 easy steps:
Create a SocialBee account
Connect your Instagram account
Create your post
Schedule Instagram post
Now you’ll be able to save time by batching content creating and scheduling your Instagram posts. If you have any questions or get stuck at any point, please comment below and we’ll do our best to help!
Thanks for reading and best of luck!